
If your Windows computer feels slow and you see a process called iphlpsvc using a lot of CPU or memory in Task Manager, don’t worry. It’s a normal Windows service called the IP Helper Service, which helps with internet connections, VPNs, and IPv6 networks.
Sometimes, small issues like bad drivers or VPN errors can make this service use too many system resources. In this guide, you’ll learn what iphlpsvc does, why it can slow down your PC, and how a simple iphlpsvc tweak can fix the problem and make your computer run faster.
TL;DR: Quick Fix Checklist
If you’re looking for a fast, safe way to address iphlpsvc high CPU or memory usage, this quick checklist summarizes the key steps before diving into the detailed guide:
- Identify the culprit – Open Task Manager (Ctrl + Shift + Esc) and expand the Service Host processes to see if IP Helper (iphlpsvc) is consuming high CPU or memory.
- Confirm with Process Explorer – Download Process Explorer from Sysinternals to inspect threads, handles, and DLLs tied to iphlpsvc. This ensures you are tweaking the right service.
- Restart the service – Sometimes, a simple restart clears temporary issues. Open Services (services.msc), locate IP Helper, and click Restart.
- Diagnose root causes – Check Event Viewer for errors, inspect network adapters (ipconfig /all), and identify ghost tunnel adapters like Teredo, ISATAP, or 6to4.
- Apply non-destructive tweaks – Update network drivers, reset Winsock/TCP stack, flush DNS, and uninstall misbehaving VPNs or virtual adapters.
- Modify service startup type carefully – If necessary, set IP Helper to Manual instead of Automatic to conserve resources. Disabling it entirely should be a last resort.
- Rollback plan – Always document your changes and know how to re-enable iphlpsvc in case networking features break.
- Advanced troubleshooting – If CPU or memory usage remains high, scan for malware, perform a clean boot, or use Process Monitor to trace the issue further.
✅ Tip: This checklist is designed for users who want a fast, safe overview before diving into a full iphlpsvc tweak guide. Following these steps can prevent accidental network disruptions.
What is iphlpsvc (Windows IP Helper Service)?
The term iphlpsvc might look like a strange or suspicious process in Task Manager, but it’s actually a legitimate Windows service called the IP Helper Service. This background process helps your PC manage network configurations, allowing smooth and secure communication with local and internet networks.
At its core, iphlpsvc is responsible for:
- IPv6 connectivity – Keeps your system ready for modern IPv6 networks, ensuring faster and more reliable connections.
- Network tunneling technologies – Supports Teredo, 6to4, ISATAP, and IP-HTTPS, which allow IPv6 traffic to work even on older IPv4 networks.
- Programmatic network queries – Lets Windows and other applications check network status, manage adapters, and handle routing automatically.
Usually, iphlpsvc runs quietly and uses very little CPU or memory. However, it can start consuming extra resources when something repeatedly triggers it, such as:
- Outdated or misconfigured network drivers
- Conflicting VPN or virtual adapter software
- Corrupted or “ghost” tunnel adapters
- System errors or hidden malware
Don’t worry — iphlpsvc is not a virus. The genuine Windows file is safely located in:
C:\Windows\System32
Key takeaway: The IP Helper Service is vital for modern networking features, especially if you use IPv6, VPNs, or DirectAccess. Applying a safe iphlpsvc tweak can help reduce high CPU or memory usage while keeping your network functions stable.
Why People Search “iphlpsvc tweak” — Common Symptoms & Scenarios
Many Windows users look for an iphlpsvc tweak when their PC starts acting slow or unstable due to the IP Helper Service. Knowing the common signs and situations can help you decide whether tweaking this service is the right move—or if another fix might be safer.
Common Symptoms That Lead to an iphlpsvc Tweak
- High CPU Usage – You may notice a svchost.exe process using a lot of CPU even when idle. This often happens when apps, VPN clients, or tunnel adapters repeatedly trigger the iphlpsvc service.
- High Memory Usage – In some cases, iphlpsvc consumes too much memory, making older or low-RAM systems feel sluggish.
- Network Instability – Frequent disconnections, timeouts, or IPv6-related app errors can cause iphlpsvc to work harder, increasing CPU activity.
- VPN or Virtual Adapter Conflicts – Certain VPN tools or virtual networks constantly ping iphlpsvc, leading to unwanted resource spikes.
- After Windows Updates – New updates sometimes cause driver or adapter conflicts, resulting in higher iphlpsvc activity until the system settles.
Real-World Scenarios
- Home users may notice their laptop slowing down when iphlpsvc suddenly spikes.
- Gamers can experience lag or frame drops because background CPU cycles are consumed by the IP Helper Service.
- IT and corporate users relying on DirectAccess or IPv6 tunnels can face network issues if the service is disabled or misconfigured.
Why People Search for an iphlpsvc Tweak
When users search for an iphlpsvc tweak, they usually want to:
- Reduce CPU or memory usage
- Stop runaway svchost.exe processes
- Improve system performance without losing network functions
- Safely disable or modify iphlpsvc when IPv6 or tunneling isn’t needed
⚠️ Important: Don’t rush to tweak or disable iphlpsvc without checking for the root cause. On business or VPN-connected systems, improper changes can break network connectivity.
When You Should (and Shouldn’t) Consider an iphlpsvc Tweak
Not every spike in CPU or memory caused by iphlpsvc needs a tweak. Knowing when it’s safe to adjust the service—and when it’s risky—can prevent accidental network issues.
When You Should Consider an iphlpsvc Tweak
- Confirmed Resource Usage – Use Task Manager or Process Explorer to make sure iphlpsvc is truly causing high CPU or memory. If another process is responsible, tweaking IP Helper won’t help.

- No IPv6 or DirectAccess Dependence – If your PC doesn’t rely on IPv6 features like DirectAccess, IP-HTTPS, or Teredo tunneling, it’s safer to modify the service.
- Persistent Performance Problems – You’ve already tried restarting the service, updating drivers, resetting the network stack, and removing ghost tunnel adapters, but spikes continue.
- Low-Spec Systems – Older or memory-limited PCs may benefit from a tweak to reduce background CPU or memory usage.
When You Shouldn’t Consider an iphlpsvc Tweak
- Active Corporate or Remote Networks – Disabling IP Helper on machines using DirectAccess, VPNs, or group policies can break network connectivity. Always check with IT first.
- Unverified Cause – If you haven’t confirmed iphlpsvc is the problem, modifying it could make things worse.
- Heavy IPv6 Usage – Systems or applications that rely on IPv6 tunnels may lose network access if the service is tweaked incorrectly.
- No Performance Impact – If IP Helper uses minimal CPU or memory, leave it alone. Tweaks provide no benefit and introduce unnecessary risk.
⚡ Pro Tip: The safest approach is to adjust service startup type or temporarily stop/restart iphlpsvc, rather than fully disabling it. This ensures Windows and applications can still access the service when needed.
Safety First: Prechecks Before Changing Services
Before performing any iphlpsvc tweak, it’s crucial to take precautionary steps. This ensures you can optimize performance without breaking networking or other Windows features.
1. Create a System Restore Point
A System Restore point lets you revert your PC to a previous state if something goes wrong. To create one:
- Press Win + S → type “Create a restore point” → Enter.
- Select your system drive → click Create → name it something like “Pre-iphlpsvc tweak” → Create.
This provides a safety net for any missteps during tweaking.
2. Backup the Registry for IP Helper
If you plan to modify registry keys:
- Press Win + R → type regedit → Enter.
- Navigate to:
HKEY_LOCAL_MACHINE\SYSTEM\CurrentControlSet\Services\iphlpsvc
3. Right-click → Export → save the file with a recognizable name.
This ensures you can restore original settings if needed.
3. Check Service Dependencies
IP Helper may have dependencies or may be required by other services. To verify:
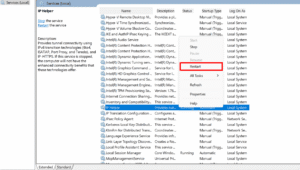
- Open Services (services.msc) → locate IP Helper → Right-click → Properties.
- Click the Dependencies tab.

- Note which services depend on IP Helper and which services it depends on.
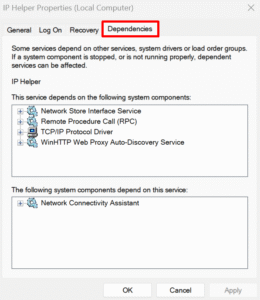
⚠️ If critical services depend on IP Helper, avoid disabling it. Opt for Manual startup or temporary stop instead.
4. Document Your Planned Changes
Before making changes:
- Write down the current startup type (Automatic, Manual, Disabled).
- Note any commands or registry edits you plan to run.
- Keep these notes handy for rollback.
5. Test on a Non-Production System (Optional but Recommended)
If possible, try tweaks on a secondary or virtual machine first. This helps avoid accidental network issues on your main system.
✅ Key Takeaway
Performing these prechecks protects your system and ensures that an iphlpsvc tweak is safe, reversible, and controlled. Skipping these steps can lead to connectivity problems or unexpected errors.
Diagnose Root Cause (Do This Before Any Tweak)
Before performing any iphlpsvc tweak, it’s essential to identify the true cause of high CPU or memory usage. Often, the service is reacting to underlying issues rather than being the problem itself. Diagnosing first ensures you only tweak what’s necessary and avoid breaking network functions.
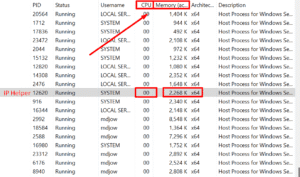
1. Observe in Task Manager and Resource Monitor
- Press Ctrl + Shift + Esc to open Task Manager.
- Expand Service Host processes to locate IP Helper (iphlpsvc).
- Note CPU and memory usage over a few minutes.
Next, open Resource Monitor → CPU and Memory tabs. This gives a timeline of resource spikes and helps confirm iphlpsvc’s involvement.
2. Inspect Deeply with Process Explorer
- Download Process Explorer from Sysinternals.
- Hover over the svchost.exe hosting iphlpsvc to view active threads, handles, and loaded DLLs.
- Confirm whether high CPU/memory comes from iphlpsvc threads or other services.
⚡ Pro Tip: Process Explorer often reveals hidden causes like third-party apps or virtual adapters that Task Manager alone cannot show.
3. Check Event Viewer for Errors
- Press Win + X → Event Viewer → Windows Logs → System and Application.
- Look for errors or warnings related to Service Control Manager, network adapters, or IP Helper around the time CPU spikes.
Event IDs and error messages often indicate driver failures, misconfigured tunnels, or repeated service restarts.
4. Inspect Network and Tunnel Adapters
- Open Command Prompt → ipconfig /all.
- Look for Teredo, ISATAP, or 6to4 tunnel adapters.
- Open Device Manager → View → Show hidden devices → Network adapters. Remove duplicates or ghost adapters.
Many iphlpsvc spikes are caused by failing or duplicate tunnel adapters repeatedly calling the service.
5. Check Teredo and ISATAP Status
Run these commands in an elevated Command Prompt:
netsh interface Teredo show state
netsh interface ipv6 isatap show state
- If tunnels show “offline” or “dormant,” iphlpsvc may be repeatedly attempting to reconnect.
- Misbehaving tunnels are a common source of CPU spikes.
6. Perform a Clean Boot
- Press Win + R, type msconfig, Enter.
- Under the Services tab → check Hide all Microsoft services → disable the rest.
- Restart Windows.
If CPU/memory spikes disappear, a third-party service or application is likely triggering iphlpsvc. Re-enable services in small batches to identify the culprit.
7. Check Installed Networking Software
- VPN clients, Docker, VMware, VirtualBox, and other virtual adapters often interact with IP Helper.
- Ensure drivers are updated or temporarily uninstall suspicious software to see if spikes resolve.
✅ Key Takeaway
Diagnosing the root cause before tweaking iphlpsvc ensures that you address the actual problem—often faulty drivers, ghost tunnel adapters, or conflicting software—rather than blindly modifying a critical Windows service. This step significantly reduces risk and improves system stability.
Safe iphlpsvc Tweak Methods (Step-by-Step)
Once you’ve diagnosed the cause of high CPU or memory usage, you can consider performing an iphlpsvc tweak. The goal is to reduce resource consumption without breaking networking functionality. Below are the safest, most effective methods, ordered from least to most invasive.
⚠️ Important: Always have a System Restore point or backup before making changes.
Method A — Restart the Service (No Configuration Change)
- Press Win + R → type services.msc → Enter.
- Locate IP Helper → Right-click → Restart.

- Monitor CPU and memory usage in Task Manager for 10–15 minutes.
Why: A restart often clears temporary issues caused by driver or network adapter glitches. This is the safest first step before any configuration changes.
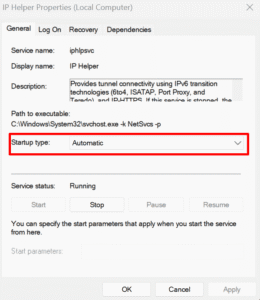
Method B — Set Startup Type to Manual
Instead of disabling IP Helper entirely, you can configure it to start only when needed:
Via Services UI:
- Open Services → IP Helper → Right-click → Properties.
- Change Startup type → Manual → Apply → OK.
Via Command Prompt:
sc.exe config iphlpsvc start= demand
Why: This prevents the service from consuming resources constantly while still allowing applications or Windows to start it when needed.
Method C — Stop the Service Temporarily
If you want to test whether IP Helper is the cause:
Command Prompt (Admin):
sc.exe stop iphlpsvc
Or via Services UI: Right-click → Stop.
Why: Temporarily stopping the service can confirm if spikes disappear, helping you decide on further tweaks.
Method D — Disable the Service (Last Resort)
Via Services UI:
- Open Services → IP Helper → Properties.
- Change Startup type → Disabled → Stop → OK.
Via Command Prompt:
sc.exe config iphlpsvc start= disabled
sc.exe stop iphlpsvc
Via Registry (Advanced Users):
- Open regedit.
- Navigate to:
HKEY_LOCAL_MACHINE\SYSTEM\CurrentControlSet\Services\iphlpsvc
3. Modify the Start DWORD:
- 2 = Automatic
- 3 = Manual
- 4 = Disabled → Change to 4 to disable.
- 2 = Automatic
⚠️ Warning: Disabling IP Helper can break IPv6, VPNs, DirectAccess, or other network-dependent features. Use only when you understand the risks and have a rollback plan.
Method E — Target Tunnel Adapters (Recommended Alternative)
Often, CPU/memory spikes are caused by misbehaving tunnel adapters rather than IP Helper itself. Disabling unused tunnels can reduce resource usage without touching the service:
Disable Teredo (Admin Command Prompt):
netsh interface Teredo set state disabled
Re-enable if needed:
netsh interface Teredo set state type=default
Tips:
- Also check ISATAP and 6to4 adapters (netsh interface ipv6 isatap show state).
- Remove duplicate or ghost tunnel adapters in Device Manager → View → Show hidden devices → Network adapters.
✅ This method often resolves spikes while preserving full Windows networking functionality.
Method F — PowerShell Alternative
For modern Windows users, PowerShell offers a safe way to tweak the service:
# Set to Manual
Set-Service -Name iphlpsvc -StartupType Manual
# Stop the service temporarily
Stop-Service -Name iphlpsvc -Force
# Re-enable automatic startup
Set-Service -Name iphlpsvc -StartupType Automatic
Start-Service -Name iphlpsvc
Note: Using PowerShell is equivalent to the Services UI or sc.exe commands but allows scripting for multiple machines or repeated tweaks.
✅ Key Takeaways
- Restart first — often enough to resolve issues.
- Manual startup is safer than disabling.
- Stopping the service temporarily can confirm it’s the root cause.
- Disabling entirely should be a last resort, with a rollback plan.
- Target tunnel adapters before disabling IP Helper — often solves problems with zero risk.
How to Re-enable iphlpsvc (Rollback)
After performing an iphlpsvc tweak, there may be times when you need to revert the service to its original state—especially if you experience network issues, VPN problems, or IPv6-related errors. A proper rollback ensures your system remains stable.
Method A — Using Services UI
- Press Win + R, type services.msc, and hit Enter.
- Locate IP Helper (iphlpsvc) → Right-click → Properties.
- Change Startup type to Automatic.

- Click Start (if the service is stopped) → Apply → OK.
This restores IP Helper to its default behavior.
Method B — Using Command Prompt
Open Command Prompt as Administrator and run:
sc.exe config iphlpsvc start= auto
sc.exe start iphlpsvc
- start= auto ensures the service launches automatically with Windows.
- sc.exe start iphlpsvc immediately starts the service without rebooting.
Method C — Using PowerShell
For users comfortable with PowerShell:
# Set startup type to Automatic
Set-Service -Name iphlpsvc -StartupType Automatic
# Start the service
Start-Service -Name iphlpsvc
PowerShell is ideal for scripting or re-enabling IP Helper on multiple devices.
Method D — Restore Registry Settings (Advanced)
If you previously modified the registry:
- Open Registry Editor (regedit).
- Navigate to:
HKEY_LOCAL_MACHINE\SYSTEM\CurrentControlSet\Services\iphlpsvc
3. Set the Start DWORD back to 2 (Automatic).
4. Restart Windows to apply changes.
⚠️ Warning: Only modify the registry if you are comfortable; incorrect changes can cause system issues.
✅ Key Takeaways
- Always have a rollback plan before performing an iphlpsvc tweak.
- Re-enabling the service is simple and can be done via Services UI, Command Prompt, PowerShell, or Registry.
- Test networking features after rollback to ensure full functionality.
Pro Tip: After rollback, monitor Task Manager for a few hours to confirm CPU and memory usage have stabilized.
Troubleshooting Checklist (If CPU/Memory Stays High After Tweaks)
Sometimes, even after performing an iphlpsvc tweak, CPU or memory usage may remain high. This section provides a step-by-step troubleshooting checklist to identify and resolve lingering issues.
1. Confirm iphlpsvc Is Still the Culprit
- Open Task Manager → Details tab → sort by CPU or Memory.
- Ensure iphlpsvc is truly causing the spike.
- If another service or process is responsible, address it separately.
2. Check Network Adapters and Tunnel Services
- Run ipconfig /all in Command Prompt.
- Look for unused or ghost tunnel adapters: Teredo, ISATAP, 6to4.
- Disable or remove duplicates in Device Manager → View → Show hidden devices → Network adapters.
Often, high resource usage is triggered by misbehaving virtual adapters rather than IP Helper itself.
3. Reset Network Stack
Sometimes corrupted network configurations cause IP Helper to loop continuously. To reset:
netsh winsock reset
netsh int ip reset
ipconfig /flushdns
- Restart your PC after running these commands.
- Monitor CPU/memory usage afterward.
4. Update Network Drivers
- Open Device Manager → Network adapters.
- Right-click each adapter → Update driver → Search automatically.
- Outdated drivers often cause repeated IP Helper calls and spikes.
5. Scan for Malware
Malware sometimes impersonates system processes like iphlpsvc.
- Use Windows Defender or a trusted antivirus to scan your system.
- Remove any threats and reboot.
6. Perform a Clean Boot
- Press Win + R → msconfig → Services tab → Hide all Microsoft services → Disable remaining.
- Reboot.
- If CPU/memory spikes disappear, re-enable services in small groups to isolate the offending application.
7. Check VPN and Virtual Network Software
- VPN clients, Docker, VMware, or VirtualBox can trigger repeated calls to IP Helper.
- Temporarily uninstall or disable them and observe system performance.
- Consider updating or switching to alternatives that are more compatible with Windows networking.
8. Monitor Event Viewer
- Open Event Viewer → Windows Logs → System.
- Look for repeated warnings or errors related to IP Helper or network adapters.
- Address underlying driver or adapter issues highlighted in logs.
✅ Key Takeaways
- Persistent CPU or memory spikes usually indicate underlying issues rather than IP Helper itself.
- Following this troubleshooting checklist ensures that your iphlpsvc tweak is both safe and effective.
- Always test network features (VPNs, IPv6 apps, remote connections) after troubleshooting to confirm everything works.
Real-World Examples & Case Studies
Understanding how IPHLPSVC tweaks work in real scenarios can help you apply changes safely and confidently. Below are some practical examples from users and IT professionals dealing with high CPU or memory usage caused by IP Helper.
Case Study 1 — Home Laptop with High CPU
Scenario:
A user noticed their Windows 10 laptop running slow, with CPU usage spiking to 40–50% when idle. Task Manager identified svchost.exe hosting iphlpsvc as the culprit.
Diagnosis:
- Using Process Explorer, the user discovered repeated calls from a ghost Teredo tunnel adapter.
- No VPN or DirectAccess was in use.
Solution:
- Disabled the Teredo adapter via Command Prompt:
netsh interface Teredo set state disabled
- Set IP Helper startup type to Manual.
- Restarted the system.
Result:
- CPU usage normalized to 1–2% idle.
- Network connectivity remained fully functional since IPv6 features were not required.
Case Study 2 — Corporate Laptop with VPN Conflicts
Scenario:
An employee using a corporate VPN experienced frequent spikes in memory usage, slowing down daily tasks. IT support noticed iphlpsvc repeatedly consuming memory when the VPN was active.
Diagnosis:
- Event Viewer showed repeated connection attempts via IP Helper tied to the VPN client.
- The VPN software was outdated and not fully compatible with Windows 11.
Solution:
- Updated the VPN client to the latest version.
- Set IP Helper to Manual startup.
- Removed unused virtual adapters left behind by old VPN installs.
Result:
- Memory usage stabilized.
- VPN and IPv6-dependent applications worked without errors.
- No need to fully disable IP Helper, maintaining network safety.
Case Study 3 — Gamer Optimizing Performance
Scenario:
A gamer noticed frame drops during online matches and discovered that iphlpsvc occasionally spiked CPU usage up to 25%, affecting performance.
Diagnosis:
- A virtual adapter left by Docker was causing IP Helper to process frequent network calls.
- High CPU usage occurred only when Docker was running in the background.
Solution:
- Removed the unused virtual adapter in Device Manager.
- Set IP Helper startup type to Manual.
- Created a batch script to temporarily stop IP Helper when running games:
sc.exe stop iphlpsvc
Result:
- Gaming performance improved without permanent network disruption.
- IP Helper could be restarted manually after gaming sessions.
Key Lessons from Real-World Examples
- Most issues are caused by adapters or software, not IP Helper itself.
- Manual startup or temporary stop is safer than full disablement.
- Diagnosing before tweaking prevents accidental network problems.
- Always document changes and have a rollback plan.
💡 Takeaway: A well-planned iphlpsvc tweak can optimize system performance while preserving essential network functions.
Alternative Fixes (Without Disabling iphlpsvc)
If you’re hesitant to perform an iphlpsvc tweak that modifies or disables the service, there are several safe alternatives to reduce CPU or memory usage while keeping networking fully functional.
1. Update Network Drivers
Outdated or incompatible drivers often trigger repeated calls to IP Helper.
Steps:
- Open Device Manager → Network adapters.
- Right-click each adapter → Update driver → Search automatically.
- Restart your PC.
Updated drivers often resolve spikes without touching the service itself.
2. Remove Ghost or Unused Tunnel Adapters
Ghost adapters like Teredo, ISATAP, and 6to4 frequently cause iphlpsvc to overwork.
Steps:
- Open Device Manager → View → Show hidden devices → Network adapters.
- Remove duplicates or unused adapters.
- Confirm network stability after removal.
3. Reset Network Stack
Corrupted TCP/IP settings or Winsock entries can make IP Helper loop continuously.
Commands (Admin Command Prompt):
netsh winsock reset
netsh int ip reset
ipconfig /flushdns
- Restart Windows after running these commands.
- Monitor CPU and memory usage to see improvements.
4. Adjust VPN and Virtual Network Settings
Virtual adapters from VPNs, Docker, or VMware can trigger unnecessary IP Helper activity.
Steps:
- Update VPN or virtual network software to the latest versions.
- Disable unused virtual adapters.
- Reconfigure settings to reduce background connections.
5. Limit Background Applications
Applications that frequently query network information can indirectly stress IP Helper.
- Check startup programs in Task Manager → Startup.
- Disable non-essential apps running in the background.
- Monitor whether CPU/memory usage drops.
6. Use Power Management Settings
Optimizing your network adapter’s power management can reduce unnecessary IP Helper activity:
- Open Device Manager → Network adapters → Properties → Power Management.
- Uncheck Allow the computer to turn off this device to save power.
- Apply changes and reboot.
✅ Key Takeaways
- Many performance issues can be resolved without disabling iphlpsvc.
- Focus on drivers, adapters, and background applications first.
- These alternative fixes preserve network stability while reducing CPU/memory usage.
⚡ Pro Tip: Combining adapter cleanup, driver updates, and network stack resets often resolves issues for 90% of users, making a full iphlpsvc tweak unnecessary.
Conclusion & Recommended Reading
Tuning Windows’ IP Helper Service with an iphlpsvc tweak can be a powerful way to optimize CPU and memory usage—but only when done carefully. This guide has walked you through:
- Understanding what iphlpsvc is and why it matters
- Common symptoms that trigger high CPU or memory usage
- Safe scenarios for tweaking the service
- Step-by-step methods for restarting, adjusting, or disabling iphlpsvc
- Diagnosing root causes like ghost tunnel adapters, VPN conflicts, or outdated drivers
- Troubleshooting lingering performance issues
- Real-world examples illustrating effective tweaks
- Alternative fixes that preserve networking while reducing resource usage
The key takeaway: Most iphlpsvc-related performance issues are caused by adapters, virtual networks, or software conflicts—not the service itself. Carefully planned tweaks, combined with prechecks and rollback plans, can optimize performance without breaking connectivity.
Recommended Reading & External Resources
- Microsoft – IP Helper Service Overview
IP Helper Service Overview
- Sysinternals – Process Explorer
https://docs.microsoft.com/en-us/sysinternals/downloads/process-explorer
- Netsh Commands for IPv6 and Tunnel Adapters
https://learn.microsoft.com/en-us/windows-server/administration/windows-commands/netsh
⚡ Pro Tip: Always refer to official Microsoft documentation when making system-level tweaks. This ensures safe, reliable, and supported adjustments.
FAQs About iphlpsvc Tweak
Q1. What is iphlpsvc in Windows?
Ans: IP Helper Service manages IPv6, network tunnels, and network queries.
Q2. Is it safe to tweak or disable iphlpsvc?
Ans: Safe if done carefully; full disable may break networking.
Q3. Why is iphlpsvc consuming high CPU or memory?
Ans: Ghost adapters, outdated drivers, VPN conflicts, or malware.
Q4. Can I set IP Helper startup type to Manual?
Ans: Yes, this reduces resource usage while maintaining functionality.
Q5. How do I rollback changes?
Ans: Services UI, Command Prompt, PowerShell, or restore registry/System Restore point.
Q6. Are there alternatives to tweaking iphlpsvc?
Ans: Update drivers, remove ghost adapters, reset network stack, optimize software.
Q7. How can I check if iphlpsvc is the real problem?
Ans: Use Task Manager, Resource Monitor, or Process Explorer to confirm.
✅ Key takeaway: Diagnose first, tweak safely, always have a rollback plan.


2 Comments